Adding a New Drive
Cordatus enables users to record their camera streams easily. This section explains how to integrate and set up storage drives specifically for recording camera feeds. By efficiently adding and configuring drives, users can guarantee a reliable and effective recording setup, improving Cordatus's overall performance.
Adding a New Drive via Ubuntu GUI
Below are the steps users can follow to seamlessly integrate a new drive into their system using the Ubuntu graphical user interface (GUI):
- Ensure your drive is physically connected to your computer.
- Click the Show Applications icon at the bottom left of the screen and select the Disks application. Alternatively, you can open a terminal, type
gnome-disks, and press enter to open the application. - In the application, select your disk from the list under the Disks column.
- Click on the play icon located under the bar representing your drive. If the icon is a stop icon, it means your drive is already mounted.
- You can find the path of your mounted drive in the Contents section after the text Mounted at.
Making the Drive Permanent
To ensure your drive is mounted at every reboot on the specified point, follow these steps:
- In the Disks application, select your disk from the list under the Disks column.
- Click on the gear icon located under the bar representing your drive, and then click on Edit Mount Options.
- Disable the User Sessions Defaults setting if it's enabled.
- Ensure that Mount at system startup is selected.
- Optionally, check the Show in user interface box if you want your drive to be visible in the Files application sidebar.
- Enter a mount point for your drive.
- Click OK to confirm the changes.
Adding a New Drive via Command Line (CLI)
Below are the steps users can follow to seamlessly integrate a new drive into their system using the Command Line Interface (CLI):
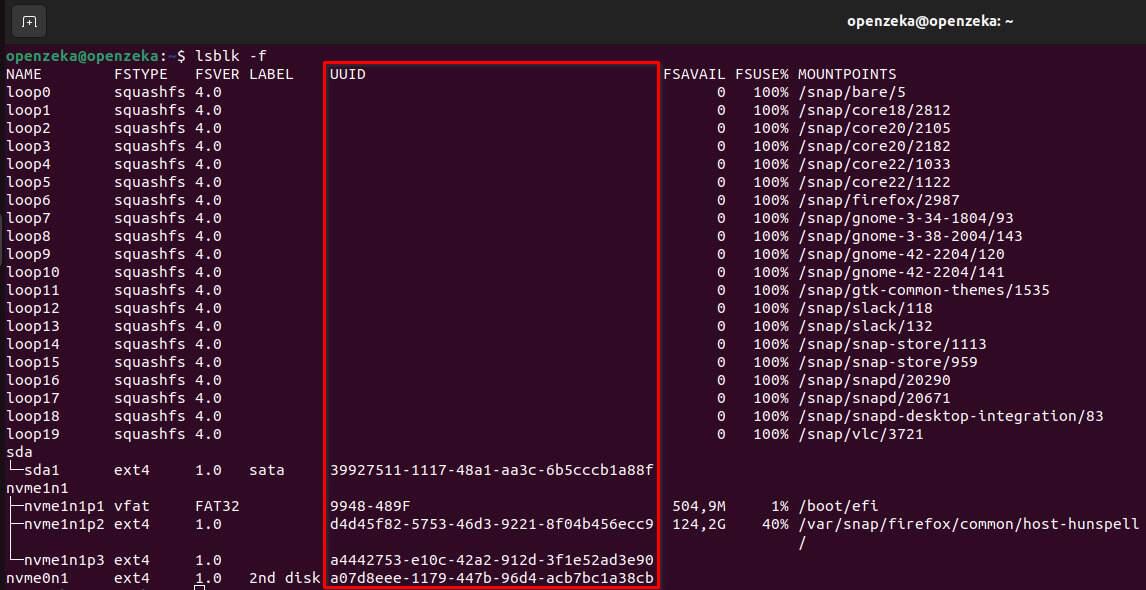
- First, determine the device UUID by using the command below. Execute the command and note the device UUID for your new drive:
lsblk -f
- Next, create a folder to serve as the mount point for your drive. Use the following sample command to create a folder named "backups" under the "mnt" folder:
mkdir /mnt/backups
- Finally, mount your device to the folder you created using the device name obtained in the previous step:
mount /dev/<device name> /mnt/backups
Making the Drive Permanent
To configure your drive to mount at startup, you'll need to modify the /etc/fstab file. This file contains entries for each device to be mounted automatically at boot time. Follow the steps below to mount your drive:
- Open the
/etc/fstabfile using a text editor application. For example, you can use thenanoapplication by running the command:
nano /etc/fstab
- Inside the
/etc/fstabfile, each device to be mounted at startup has its own entry. Add a new line for your drive, including six pieces of information separated by white space:
- Device ID (UUID): Obtain the UUID of your device using the
lsblk -fcommand, as explained in the previous section. - Mount Point: Specify the point where you want your device to be mounted.
- Type: Specify the file system type of your drive.
- Options: Customize your mount process. Use "auto" to mount your drive automatically at startup.
- Dump Option: Set whether the backup utility dump will back up the file system. Use "0" to ignore the file system or "1" to back up the file system. If in doubt use 0.
- File System Check (Fsck) Order: Specify the order for fsck to check the file systems. Use "1" for your root partition and "2" for the rest. Use "0" to disable file system checking at boot or for network shares.
A sample entry will look like:
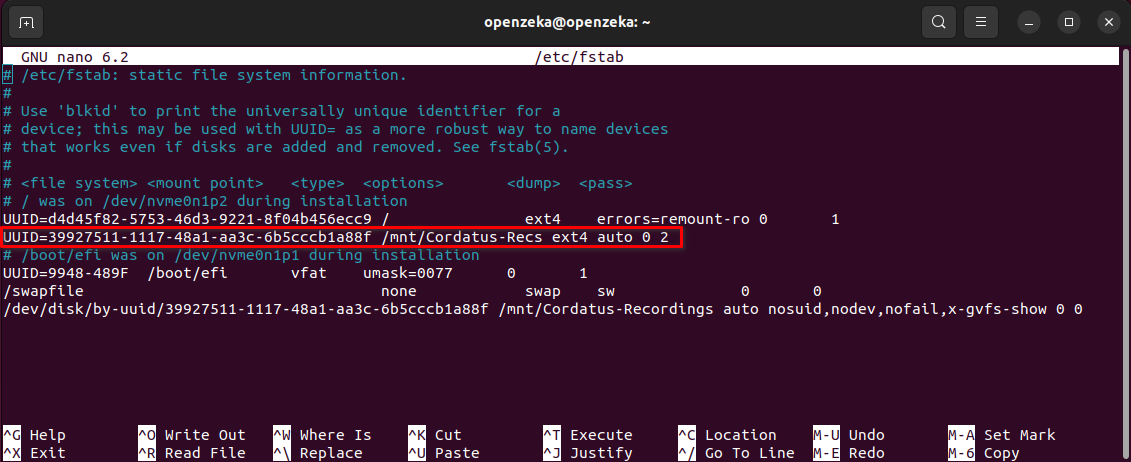
- Save the changes and exit the text editor.
After adding this line to the /etc/fstab file, your device will be mounted at the specified mount point automatically each time the system starts up.
Troubleshooting
Encountering issues while adding a new drive via Ubuntu GUI or Command Line Interface (CLI)? Below are some common problems and their solutions:
Drive Not Detected
- Ensure that the drive is physically connected to your computer.
- Check if the drive is compatible with your system.
Unable to Mount Drive
- Verify that the drive is not already mounted. If it is, unmount it before attempting to mount again.
- Check the permissions and ownership of the mount point directory.
- Ensure that the file system type of the drive is supported by your system.
Drive Mounting Unsuccessful at Startup
- Double-check the entry added in the /etc/fstab file for any errors.
- Ensure that the UUID of the device and the mount point specified are correct.
- Check the file system type and options specified in the /etc/fstab file.