User Management
Overview
The User Management system in Cordatus allows organization owners and administrators to manage team members within their organization. This system provides comprehensive control over who can access your organization, what actions they can perform, and how long their access remains valid.
User Roles & Permissions
Role-Based Access Control
Cordatus uses a role-based permission system where access to resources is determined by the roles assigned to each user.
Available Permission Types
Each role can have the following permission levels for different assets:
| Permission | Description |
|---|---|
| View (GET) | Allows viewing/reading data |
| Create (POST) | Allows creating new items |
| Update (PUT) | Allows modifying existing items |
| Delete (DELETE) | Allows removing items |
Controllable Assets
Roles can be configured to grant permissions on the following system assets:
| Asset Category | Description |
|---|---|
| Users | Manage organization members |
| Roles | Create and manage permission roles |
| Devices | Access and control edge devices |
| Cameras | Manage IP and physical cameras |
| Jobs | Control inference jobs |
| Licences | View and manage licences |
| Models | Access AI models |
| Pipelines | Manage AI pipelines |
| Engines | Control inference engines |
| Analytics Dashboard | View analytics data |
| Notification Channels | Configure alarm channels |
| Schedules | Manage scheduled tasks |
| Device Alarms | Configure device alerts |
| Inference Alarms | Set up AI-based alerts |
| Networks | Manage network configurations |
| Records | Access recorded data |
| Containers | Manage application containers |
| Private Repositories | Access private container registries |
Special Role: Superadmin
The superadmin role is a system-protected role with the following characteristics:
- Cannot be deleted or modified
- Has full access to all organization resources
- Automatically assigned to organization owners
- Cannot be assigned to other users manually
Role Limits
- Each user can have a maximum of 3 roles assigned simultaneously
- Roles can have an expiration date after which permissions are automatically revoked
Role Management
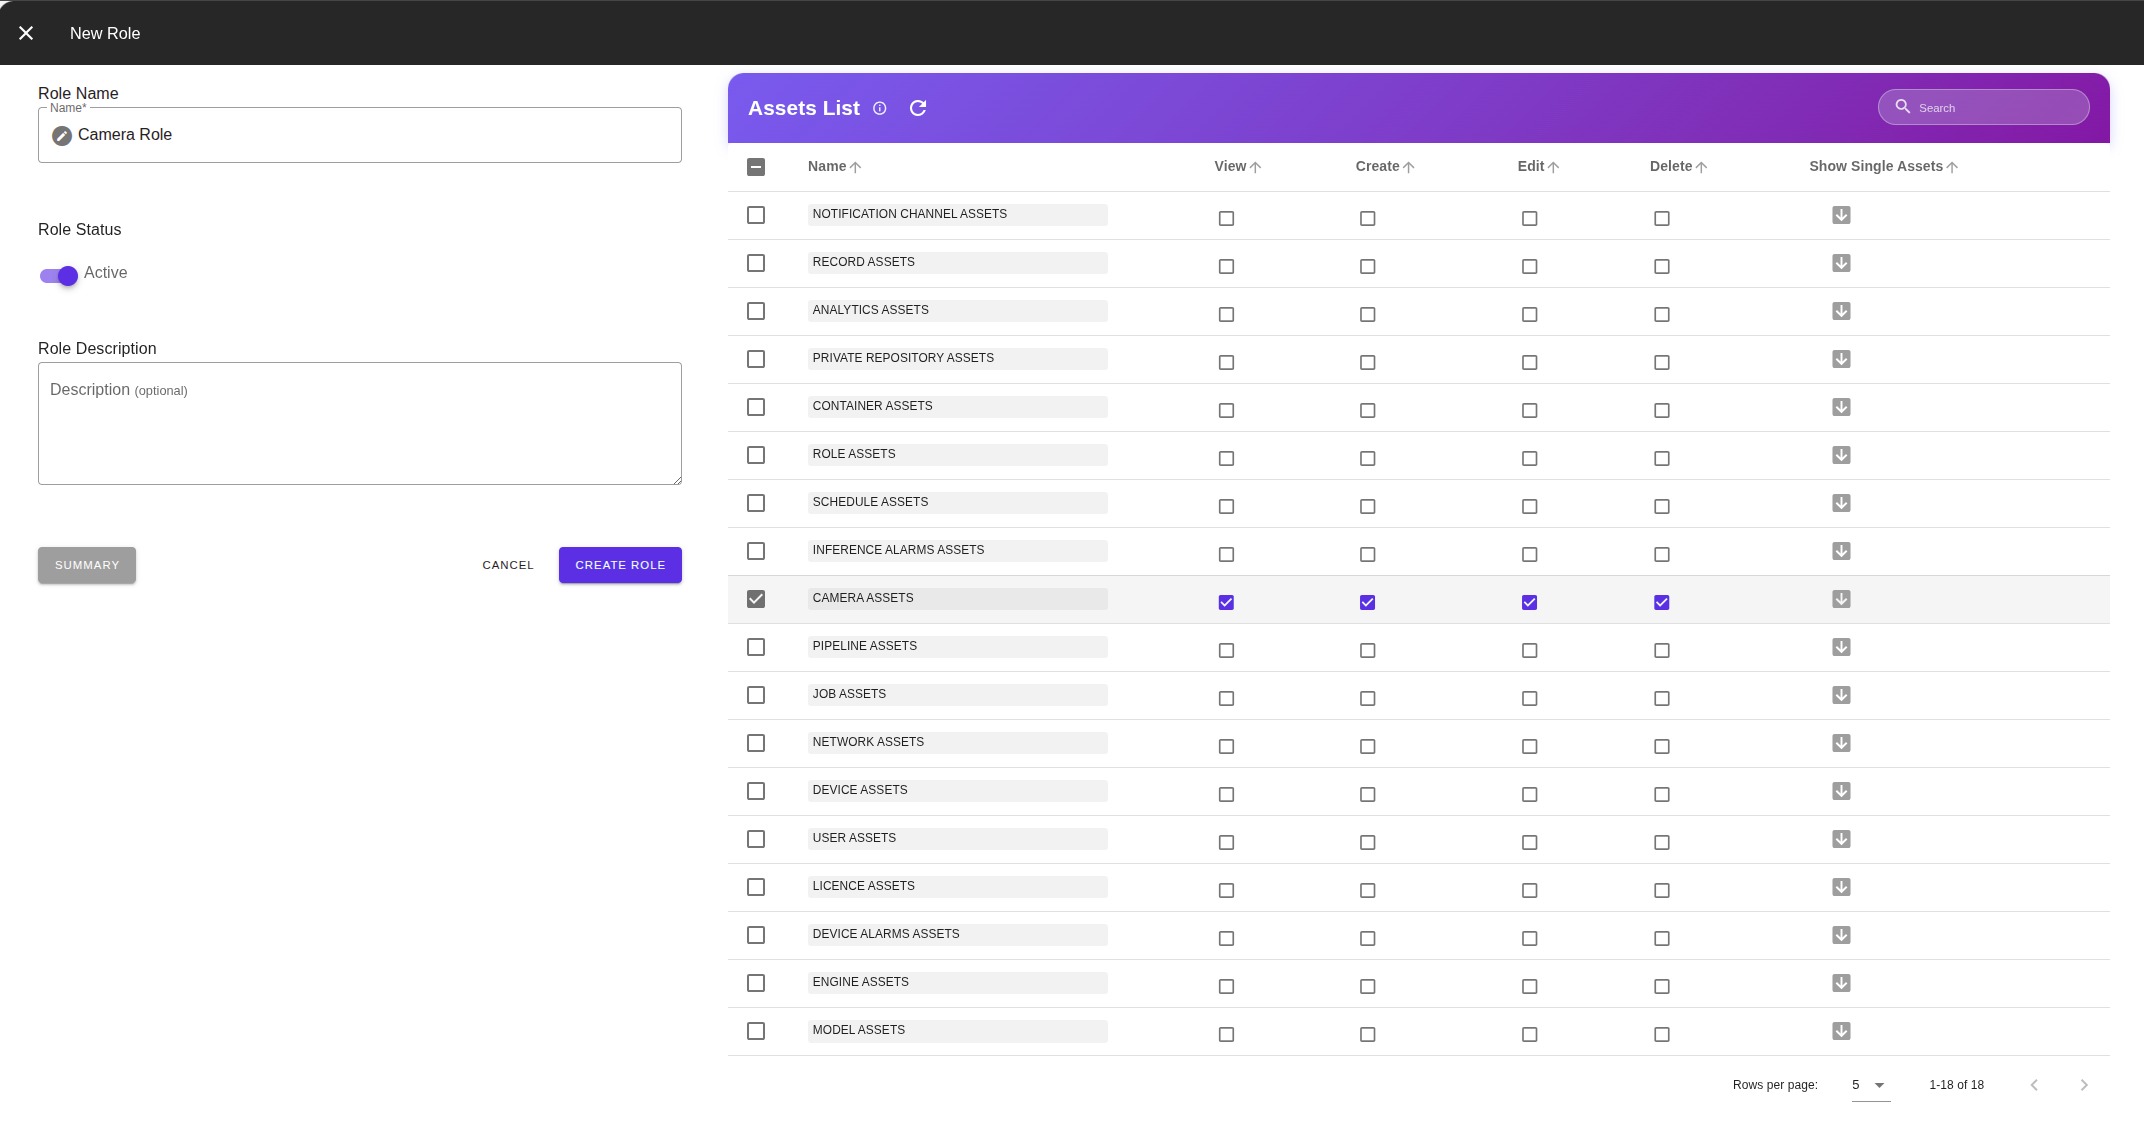
Creating a New Role
To create a custom role for your organization:
- Navigate to Settings → Roles
- Click the "Create Role" button
- Enter a Role Name (e.g., "Camera Operator", "Read-Only Viewer")
- Configure permissions for each asset:
- Toggle View, Create, Update, Delete as needed
- Click Save
Editing a Role
- Find the role in the Roles list
- Click the Edit button (pencil icon)
- Modify the role name or permissions
- Click Save
Changing role permissions affects all users currently assigned to that role immediately.
Deleting a Role
- Find the role in the Roles list
- Click the Delete button (trash icon)
- Confirm the deletion
You cannot delete a role that is currently assigned to users. First remove the role from all users, then delete it.
Best Practices for Role Design
| Scenario | Recommended Approach |
|---|---|
| External contractors | Create time-limited roles with minimal permissions |
| Department-specific access | Create roles per department (e.g., "Security Team", "Operations") |
| Read-only access | Create a role with only View permissions |
| Full management | Use superadmin or create a role with all permissions |
User Lifecycle
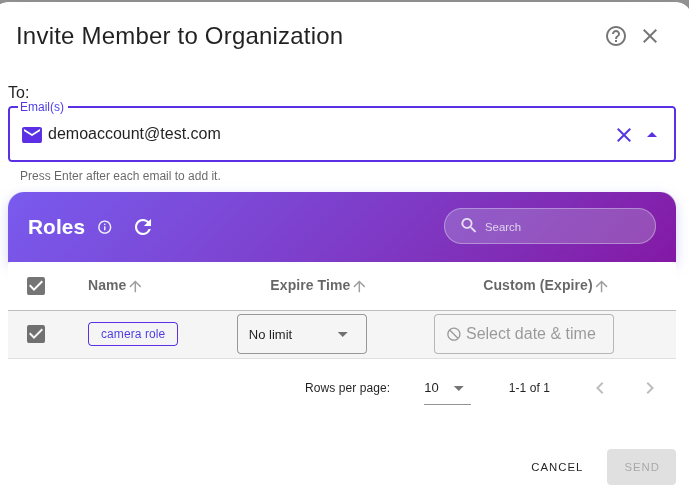
Creating/Inviting a User
Users are added to an organization through an invitation system:
- Navigate to Users Management page
- Click the "Invite Member" button
- Enter one or more email addresses (press Enter after each email)
- Select the role(s) to assign (maximum 3)
- Optionally set role expiration:
- No Limit: Role never expires
- 7 Days / 30 Days / 90 Days: Auto-expire after selected period
- Custom: Select a specific date and time
- Click Send Invitation
The invited user must already have a registered Cordatus account. The invitation link is sent to the user's email, and users must accept the invitation to join the organization.
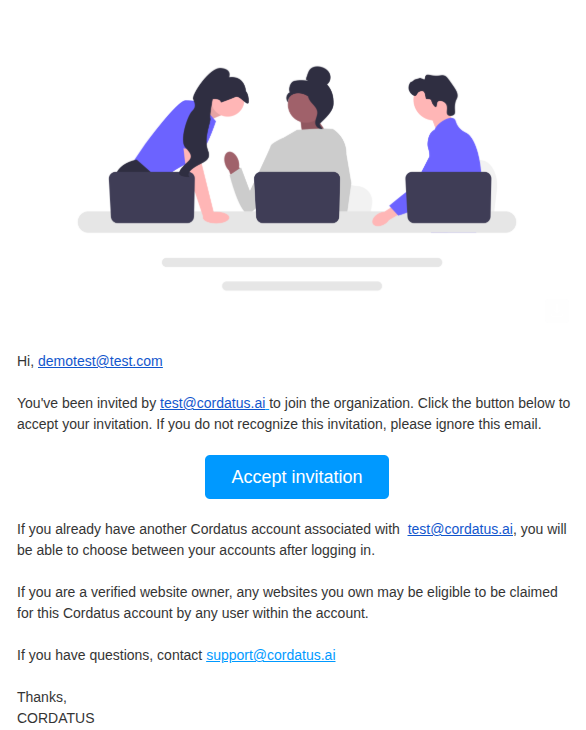
Accepting an Invitation
When a user receives an invitation:
- User receives an email with an invitation link
- Clicking the link opens the Cordatus invitation acceptance page
- User confirms acceptance
- Upon acceptance, the user gains access to the organization with assigned roles
Editing User Roles
To modify a user's assigned roles:
- In the Users Management table, locate the user
- Click on the Roles column chip to see current roles
- Click "Manage Role" button
- Select or deselect roles as needed
- Adjust role expiration dates if required
- Save changes
Activating / Deactivating Users
Users can be temporarily deactivated without removing them from the organization:
To Deactivate:
- Find the user in the Users Management table
- Click the actions menu (three dots icon)
- Select "Deactivate"
To Reactivate:
- Find the deactivated user
- Click the actions menu
- Select "Activate"
Deleting Users
Single User Deletion:
- Click the actions menu next to the user
- Select "Delete"
- Type DELETE (in capitals) to confirm
- Click confirm
Bulk User Deletion:
- Select multiple users using the checkboxes
- Click "Delete Selected" button
- Type DELETE to confirm
- All selected users will be removed
Deleting a user removes them from the organization but does not delete their Cordatus account. They can be re-invited later.
User Statuses
Possible User States
| Status | Display | Description |
|---|---|---|
| Active | Green "Active" chip | User has accepted invitation and can access the organization |
| Pending | Orange "Pending" chip | User has been invited but hasn't accepted yet |
| Passive | Gray "Passive" chip | User has been manually deactivated by an administrator |
| Expired | Red "Expired" chip | User's invitation or role has expired |
Impact of Each Status
| Status | Can Login | Can Access Organization | Appears in Member List |
|---|---|---|---|
| Active | ✓ | ✓ | ✓ |
| Pending | ✓ | ✗ (must accept invite) | ✓ |
| Passive | ✓ | ✗ | ✓ |
| Expired | ✓ | ✗ | ✓ |
Role Expiration
Roles can have expiration dates:
- When a role expires, the user loses permissions granted by that role
- If all roles expire, the user effectively loses access to the organization
- Expired roles show as "Expired" in the role list
- Administrators can extend or remove expiration dates
Limitations & Important Notes
Security Warnings
- Share invitation links securely - Invitation links grant access to your organization
- Review role permissions carefully - Incorrect role assignments can expose sensitive data
- Set appropriate role expirations - Especially for temporary contractors or external users
- Regularly audit user access - Remove users who no longer need access
- Use strong passwords - Enforce the password policy requirements